Choose your connection in this order: phone compatibility, the services you need, then the plan price. An eSIM is convenient when your phone supports it and you are comfortable with setup. A physical SIM can suit a compatible phone when you prefer help from a staffed shop. Either choice still needs the right package and registration.
The useful question is not simply “Which SIM is best?” It is “Will this exact plan work on my phone for my whole trip, including the calls or messages I need?”
Decide what you need the phone to do
| Your plan | Look for | Check carefully |
|---|---|---|
| Maps, messaging apps and booking confirmations | A data allowance that covers your trip | High-speed limits, reduced speeds and validity |
| Calling Thai hotels or businesses | Suitable local voice service | Included destinations, minutes and extra charges |
| Receiving verification messages | The required number and incoming SMS capability | Whether the message must go to your home number |
| Sharing internet with a laptop | Tethering or hotspot support | Both the package rules and device settings |
| Visiting another country after Thailand | Separate coverage for that country | Whether Thailand-only service ends at the border |
A Thai number does not replace your home number for an account registered to that home number. Messaging-app calls and ordinary telephone calls are also different services. Ask for the feature you need rather than relying on the words “tourist SIM”.
Check the exact phone before buying
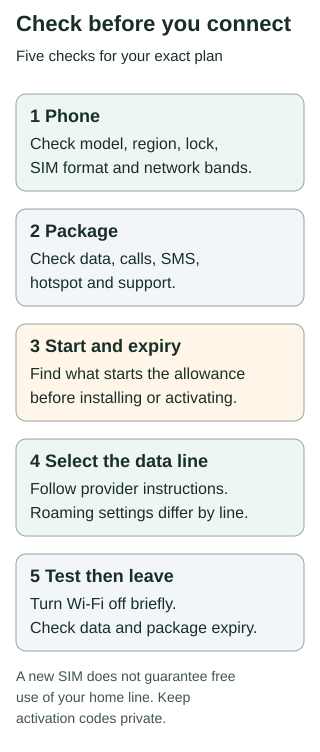
Find your phone's model and purchase region, then check the manufacturer's specifications for physical SIM, eSIM and dual-SIM support. A brand name alone is not enough.
On an iPhone, Apple's travel guidance explains how to check the carrier lock in Settings → General → About. An unlocked phone shows No SIM Restrictions beside Carrier Lock. Using another carrier requires an unlocked iPhone. Regional model differences also matter. For Android, check the maker's support page for your exact model and ask your current carrier about any lock. Apple international eSIM guidance
Check that your exact phone model supports the chosen carrier's network bands as well as the SIM format; a compatible tray or eSIM menu alone does not establish network compatibility. True/dtac device requirements
If you will use a physical SIM, check that the phone has a compatible tray. If you want to keep two lines active, verify that the phone supports the combination you intend to use. Do this while you still have reliable internet and time to ask for help.
Compare the plan behind the headline
Open the AIS tourist plan page and True/dtac tourist plan page as starting points. Both provide tourist SIM information. Compare the exact product offered through your chosen purchase channel; do not assume that a similarly named offer has identical terms.
Before paying, record:
- Coverage: Thailand, or the actual countries you need.
- Validity: how long it lasts and exactly what starts the clock.
- Data: high-speed allowance, later speed and any fair-use rules.
- Calls and messages: outgoing calls, incoming calls, SMS and the number provided.
- Sharing: whether your intended hotspot use is allowed.
- Registration: documents and identity checks required.
- Total: tax and any added charges at purchase.
- Help: setup support, refund conditions and reinstallation or transfer rules.
Do not read “unlimited” as a guarantee of the same speed everywhere. True/dtac's terms explicitly make performance dependent on factors including coverage, the device and network conditions. Its tourist terms also require passport registration. Use the provider's official registration route or staffed shop, and keep your receipt. True/dtac tourist terms
Separate installation from starting the allowance
Buying a plan, adding an eSIM to the phone, completing identity checks and starting the package are not necessarily the same event. Before installing, find the instructions for your exact product. If the start trigger is unclear, ask the provider before scanning or activating it.
Prepare these items while you have Wi-Fi:
- Your order confirmation and the provider's setup instructions.
- A way to view the activation instructions while working on the phone.
- The support contact and order reference.
- A saved hotel address and transfer plan in case setup takes longer than expected.
Keep activation codes private. Do not post a screenshot of an eSIM QR code when asking a public forum for help. Follow the carrier's supported installation method. On supported iPhones, Apple documents QR-code, app and other activation methods; the available method depends on the carrier. Apple eSIM setup
Choose which line uses mobile data
After adding the travel line, label the lines clearly, such as Home and Thailand. Choose the intended line for mobile data. Check your device's automatic data-switching setting and your home carrier's roaming terms before leaving both lines enabled.
Roaming settings are line- and product-specific. Follow the travel provider's instructions for the travel line; do not turn roaming on for every line simply because one setup guide requires it. Keeping a home line available may be useful, but it is not a guarantee that calls, messages or other use will be free. Apple travel guidance
If you need your home number for account access, decide how to retain it before removing a physical SIM or disabling a line. Save a physical SIM somewhere secure if you swap it out.
Test the connection before leaving support
When the provider says the plan is active and ready:
- Turn Wi-Fi off briefly and open a simple webpage.
- Confirm that the intended travel line is providing data.
- Open the map or booking app you need for your next journey.
- If the plan includes voice or SMS you need, ask staff how to verify it without unexpected charges.
- Check where you can see remaining allowance and expiry.
If it fails, reconnect to Wi-Fi and check registration, package status and the selected data line first. Give official support the error message and order reference. Do not delete the eSIM as a first troubleshooting step: confirm the provider's replacement or reinstallation process before removing it.
Keep this connection card
- Exact phone model and purchase region:
- Provider and exact plan:
- Physical SIM or eSIM:
- Package start trigger and expiry:
- Data, voice and SMS included:
- Mobile-data line selected:
- Home-line arrangement:
- Support contact and order reference:
A workable plan is one you can activate, understand and get help with. If the cheapest offer leaves key conditions unanswered, compare another product or use a staffed official shop.
Source review: 4 October 2026, Thailand time. This guide is based on the linked operator and manufacturer information. It does not claim a new SIM purchase, coverage test or verified cheapest plan. Use the exact product's current terms for prices, activation, allowance and refunds. For the wider trip, add your confirmed communication cost to the budget and packing worksheet.